Test Programs
This program dumps out a section of memory in the Intel .hex format.
Note that this programs was hand-assembled so the syntax may not be correct. It was entered into the Altair using the monitor ROM which is why it uses octal values indicated by the Q suffix.
Overview
One of the problems with old computers is how to get programs on and off of them. These days you can just download stuff from the internet but back in the 70s the internet didn't exist. If you were lucky you had a tape drive or a floppy disk drive but often you only had a serial terminal.
The Altair 8800 clone computer I'm using has a built in configuration monitor that allows you to load .hex files but you still need a way to generate them. That's the purpose of this program. You give it a start address and an end address and it generates the .hex data for that memory block. You can then copy the output from the terminal program and save it to a file. The memory can be restored by sending the .hex file back to the computer using the configuration monitor.
I created this program so that I could back-up and restore programs as I was working on them. The clone does have the ability to emulate a tape drive or a floppy drive but I didn't feel like I had progressed to that level yet. Also I wanted to write a program using just the serial terminal for input/output as a way of cementing my knowledge of that aspect of the computer.
Interface
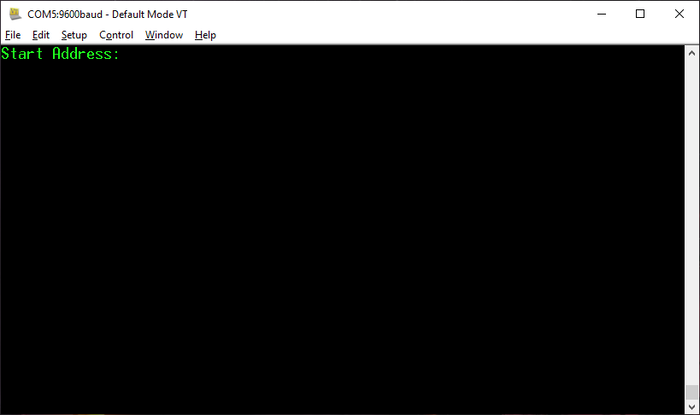
 Start Address Prompt
The program starts by prompting for a start address. This is the address, in hex, of the first byte of memory that you want to be output. You have to enter in the full 16-bit address.
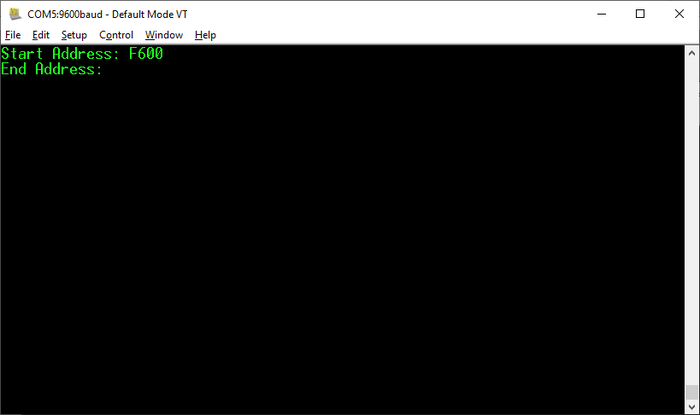
 End Address Prompt
Once you finish entering in the last digit of the start address it gives you the end address prompt. This is the address, in hex, of the last byte of memory you want output.
 Output
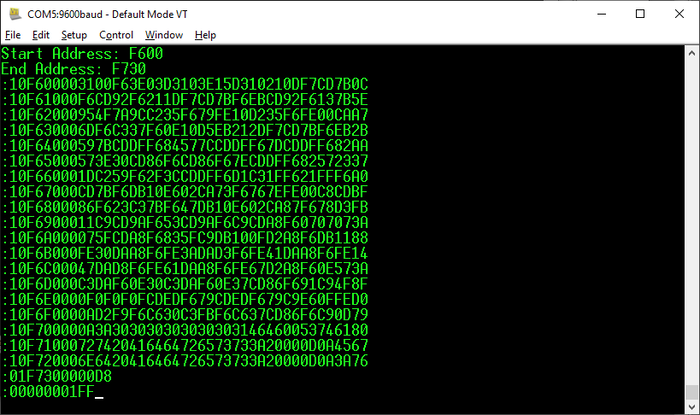
After entering the final digit of the end address the program starts running. It prints out the memory you specified with the start and end address in .hex format. Each line represents at most 16 bytes and the final line ends the .hex file.
Output
The program uses the .hex format to output the memory specified.
Every line starts with a colon. The next two characters are the byte count of the line in hex. This is followed by four hex digits that specify the starting address of the line. Next there are two hex digits that specify the record type. The two record types used in the program are 00 for data and 01 for end-of-file. This is followed by the data bytes and a checksum byte.
| Start | Byte Count | Address | Record Type | Data | Checksum |
| : | 10 | F600 | 00 | 3100F63E03D3103E15D310210DF7CD7B | 0C |
The checksum is the two's complement of the least-significant byte of the sum of all the bytes in the current line.
0x10 + 0xF6 + 0x00 + 0x00 + 0x31+ 0x00 + 0xF6 + 0x3E + 0x03 + 0xD3 + 0x10 + 0x3E + 0x15 + 0xD3 + 0x10 + 0x21 + 0x0D + 0xF7 + 0xCD + 0x7B = 0x6F4. The least-significant byte is 0xF4. A trick for doing two's complement is you start from the least-significant bit and move left until you find the first 1, then you toggle every bit after that so 1s become 0s and 0s become 1s. 0xF4 in binary is 1111 0100. The first 1 is bit 2 so we toggle bits 3 to 7 which gives us 0000 1100 which is 0x0C.
Code
HexDump.asm
The program starts by initializing the stack and the 2SIO board. The program is placed at 173000Q in memory to give plenty of room for other programs. The stack on the 8080 grows downward and is decremented before use. We initialize the stack pointer to the starting address of the program which means the first stack value will be placed right before the program. This ensures that the program can't be clobbered by the stack.
The program then displays the start prompt and reads in the user's response. The ReadHex16 subroutine stores its result in the DE register pair. The program then displays the end prompt but before reading in the value it executes the XCHG instruction. This swaps the start address in the DE register pair with the HL register pair. This has to be done after printing the end address prompt because the PrintStrZ subroutine uses the HL register pair to specify the address of the string to be printed. The end address then gets read into the DE register pair. The DE register pair is incremented to make the end address inclusive.
Next we enter the main loop of the program. It starts by determining how many bytes are left to be printed. At this point the DE register pair points to the byte right after the last one to be printed and the HL register pair points to the current byte. Initially the current byte is the start address. We calculate E – L and store it in the C register. This is the least significant byte of the length. We then calculate D – H and include any borrows from the previous calculation. If D – H is not zero then we know we definitely have at least 16 bytes and jump to setting the length of the line to 16. Otherwise we test to see if C is greater than 16, if it is then we again jump to setting the length of the line to 16. If C is 0 then we are done and can jump to printing out the end line. If C is not 0 but less than 16 bytes we use C as the length of the line and jump over the instruction to set C to 16.
At this point the end address is pushed onto the stack as we won't need it for a while. The DE and HL registers are swapped, so that we can print out the new line text without losing the current address, and then swapped back. The length is copied to the E register and then printed to the output. We then add the H register, which contains the most significant byte of the current address, to the accumulator and store the result in the D register. The D register is used to store accumulated sum of the bytes printed so far which will be used to calculate the checksum at the end of the line. We don't care about overflow because we are only interested in the least-significant byte of the sum. This addition adds the length byte which has already been printed to the most-significant byte of the current address which is about to be printed. We continue by writing out the current address and adding the least-significant byte of the address to the D register. Next we print out two zeros which represent the record type, 00 for data.
Now we enter into the data loop to print out the values from memory. We start by loading the value pointed to by the HL register pair into the accumulator, printing it to the output as hex digits and adding it to the checksum accumulator stored in the D register. We incensement the HL register pair to point at the next byte and decrement the number of bytes to be printed in the E register. If E is not zero then we loop to print the next byte from memory.
If E is zero then we have printed all the bytes for the line and need to print the checksum. At this point the accumulator already contains the least-significant byte of the sum of all the bytes printed. This is complemented and incremented to give the two's complement. We then print the checksum to the output. Next we pop the end address off of the stack and restart the main loop.
After all memory locations have be printed the program then prints out the end-of-file line before halting.
The PrintChar subroutine prints out a single character. The character to be printed is passed in the accumulator. PrintChar copies this character to the B register so that it can read the status of the 2SIO board. It loops until the board is ready to send data. The character is then copied back into the accumulator and sent to the output.
The PrintStrZ subroutine prints a null terminated string. The start of the string is passed in the HL register pair. It starts by loading the byte pointed to by the HL register pair into the accumulator. If this value is 0 the subroutine returns. Otherwise the character is printed by calling PrintChar, the HL register pair is incremented and the subroutine jumps back to the beginning to print the next character.
The ReadHex4 subroutine reads a single hex digit from the serial board. It starts by looping until the 2SIO board indicates a byte has been received. It then reads the character from the serial board. The rest of the subroutine determines which range the character falls into. If the character is between '0' and '9' it's a numerical digit, if it's between 'A' and 'F' it's an uppercase hex letter digit and if it's between 'a' and 'f' it's a lowercase hex letter digit. All other characters are ignored. If a valid hex digit is found then the required offset to determine the numerical value of the digit is loaded into the C register. This is the value of '0' for numerical characters, the value 067Q for uppercase letter digits and the value 127Q for lowercase letter digits. We can't simply subtract 'A' or 'a' because that would give 'A' a value of 0 when we want 'A' to have a value of 10. 067Q = 'A' - 10 and 127Q = 'a' – 10, so 'A' – 067Q = 10 and 'a' – 127Q = 10. The character is printed to the output by calling PrintChar and then the value in the C register is subtracted from the character value to determine the numeric value which is returned in the accumulator.
The ReadHex8 subroutine reads two hex digits. It starts by calling ReadHex4 to read a single hex digit. The resulting value is then rotated into the upper four bits of the accumulator and copied to the E register. ReadHex4 is called again to read in another hex digit. The value stored in the E register is added to the new value in the accumulator to give a 1-byte value and then copied back into the E register.
The ReadHex16 subroutine reads four hex digits. It calls ReadHex8 to read two hex digits which stores the result in the E register. This gets copied to the D register before ReadHex8 is called again. The resulting two-byte value is stored in the DE register pair.
The PrintHex4 subroutine prints out a single hex digit stored in the four least-significant bits of the accumulator. It starts by 'and'ing the value in the accumulator with 017Q to clear out the high-order bits. It then tests to see if the value is greater than 10 to see if it's a letter digit. If it's not a letter then the value of the '0' character is added to calculate the character value, otherwise 067Q is added. The character is then printed using PrintChar.
The PrintHex8 subroutine prints out two hex digits. The value to be printed is passed in the accumulator. The subroutine starts by saving the value in the accumulator into the C register. It then rotates the accumulator right to move the high four bits into the lower four bits. PrintHex4 is then called to print the most-significant digit of the byte. The value in C is restored to the accumulator and PrintHex4 is called again to print the least-significant digit of the byte. The value in the C restored is restored again so that it will be available after the subroutine returns.